
1. 오픈웨더에 가입 후 API키를 얻는다.
2. 내가 사용할 API를 고른다. 유로가 많아서 무료로 사용이 가능한 실시간현재날씨와 3시간, 5일의 날씨 API를 얻는다. 이또한 무료버전은 불러올 수 있는 횟수가 정해져있으니 확인하면 좋을듯하다.
< 내가 사용 할 API >
현재 날씨 데이터
Current weather data - OpenWeatherMap
openweathermap.org
3시간씩 5일의 데이터
5 day weather forecast - OpenWeatherMap
openweathermap.org
3. 각 지역별로 어떻게 날씨를 불러올 수 있는지 확인한다.
내가 날씨를 뿌리고자 하는 지역의 코드를 찾아낸다. 파일을 열면 모든 나라의 지역별 코드가 오는데 한국만 보려면 "country": "KR" 로 검색하면 바로 한국에 해당하는 지역이 나온다. 내가 봤더니 총 242개의 지역이 나왔다. 거의 내가 찾는건 다 있을정도!!
예) 서울의 ID값은 1835847이다.
https://api.openweathermap.org/data/2.5/forecast?1835847={ ID값 }&appid={ API키 넣기 }
https://api.openweathermap.org/data/2.5/forecast?id={ ID값 }&appid={ API키 넣기 }
4. 이제 API를 불러와보자. 나는 아래와 같은 방식으로 Retrofit을 사용하여 통신 할 예정이다.
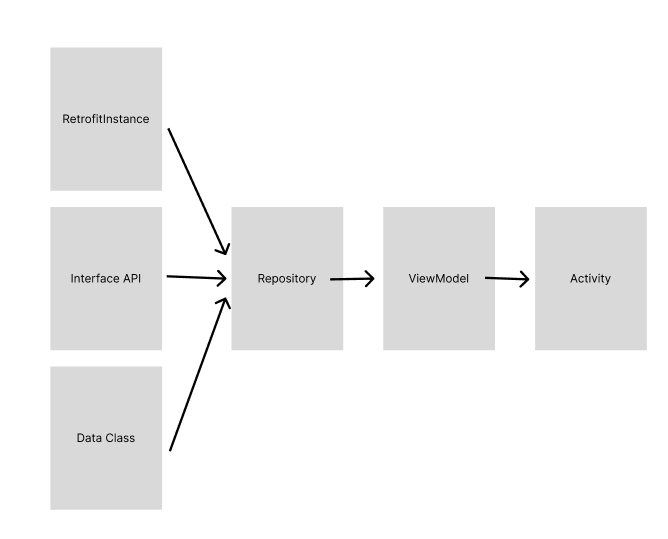
그래서 아래와 같은 파일이 필요하고, 코드는 아래에 작성해 두도록 하겠다. 오늘 나는 날씨 API를 처음 사용해보는거라 다 불러와보려고 한다. 필요한 정보만 불러 올 분들은 그래도 좋을듯 하다.
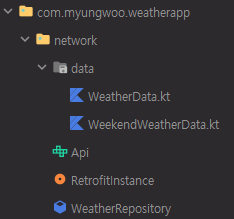
//WeatherData Class


package com.myungwoo.weatherapp.network.data

data class WeatherData(
    val coord: Coord,
    val weather: List<Weather>,
    val base: String,
    val main: Main,
    val visibility: Int,
    val wind: Wind,
    val rain: Rain,
    val clouds: Clouds,
    val dt: Long,
    val sys: Sys,
    val timezone: Int,
    val id: Int,
    val name: String,
    val cod: Int
)

data class Coord(
    val lon: Double,
    val lat: Double
)

data class Weather(
    val id: Int,
    val main: String,
    val description: String,
    val icon: String
)

data class Main(
    val temp: Double,
    val feels_like: Double,
    val temp_min: Double,
    val temp_max: Double,
    val pressure: Int,
    val humidity: Int,
    val sea_level: Int,
    val grnd_level: Int
)

data class Wind(
    val speed: Double,
    val deg: Int,
    val gust: Double
)

data class Rain(
    val hour : Double
)

data class Clouds(
    val all: Int
)

data class Sys(
    val type: Int,
    val id: Int,
    val country: String,
    val sunrise: Long,
    val sunset: Long
)//WeekendWeatherData Class
package com.myungwoo.weatherapp.network.data
data class WeatherForecast(
val cod: String,
val message: Double,
val cnt: Int,
val list: List<WeekendWeatherData>
)
data class WeekendWeatherData(
val dt: Long,
val main: MainData,
val weather: List<WeatherDetail>,
val clouds: CloudData,
val wind: WindData,
val visibility: Double,
val pop: Double,
val sys: SysData,
val dt_txt: String
)
data class MainData(
val temp: Double,
val feels_like: Double,
val temp_min: Double,
val temp_max: Double,
val pressure: Int,
val sea_level: Int,
val grnd_level: Int,
val humidity: Int,
val temp_kf: Double
)
data class WeatherDetail(
val id: Int,
val main: String,
val description: String,
val icon: String
)
data class CloudData(
val all: Int
)
data class WindData(
val speed: Double,
val deg: Double,
val gust: Double
)
data class SysData(
val pod: String
)//interface Api
package com.myungwoo.weatherapp.network
import com.myungwoo.weatherapp.network.data.WeatherData
import com.myungwoo.weatherapp.network.data.WeatherForecast
import com.myungwoo.weatherapp.network.data.WeekendWeatherData
import retrofit2.http.GET
import retrofit2.http.Path
import retrofit2.http.Query
interface Api {
@GET("weather")
suspend fun getCurrentList(
@Query("id") id: Int,
@Query("appid") apiKey: String
): WeatherData
@GET("forecast")
suspend fun getWeekendList(
@Query("id") id: Int,
@Query("appid") apiKey: String
): WeatherForecast
}//object RetrofitInstance
package com.myungwoo.weatherapp.network
import okhttp3.OkHttpClient
import retrofit2.Retrofit
import retrofit2.converter.gson.GsonConverterFactory
object RetrofitInstance {
private const val BASE_URL = "https://api.openweathermap.org/data/2.5/"
private val client = OkHttpClient.Builder()
.addInterceptor { chain ->
val original = chain.request()
val requestBuilder = original.newBuilder()
// 'method'와 'body'를 직접 사용하는 대신 'request'를 복사합니다.
val newRequest = requestBuilder.build()
chain.proceed(newRequest)
}
.build()
private val retrofit = Retrofit.Builder()
.baseUrl(BASE_URL)
.addConverterFactory(GsonConverterFactory.create())
.client(client)
.build()
fun createApi(): Api {
return retrofit.create(Api::class.java)
}
}class WeatherRepository
package com.myungwoo.weatherapp.network
class WeatherRepository {
private val apiKey: String = "{API 키}" // 여기에 실제 API 키를 넣어주세요
private val client = RetrofitInstance.createApi()
suspend fun getCurrentList(id: Int) = client.getCurrentList(id, apiKey)
suspend fun getWeekendList(id: Int) = client.getWeekendList(id, apiKey)
}
이렇게 하면 통신할 준비는 끝 이제 메인엑티비티에 WeatherRepository를 선언해주고 APi를 불러와준다
private val netWorkRepository = WeatherRepository()CoroutineScope(Dispatchers.Main).launch {
val weatherCurrentList = netWorkRepository.getCurrentList(selectedItemId)
val forecastWeatherData = netWorkRepository.getWeekendList(selectedItemId)
}
API 통신하기 끝!!
날씨 API 참고 블로그
OpenWeather 날씨 API 연동하기 (with. 나의 삽질기)
각 지역마다 날씨 정보를 가져오기 위해 OpenWeather API를 사용하였다. 여러 지역의 데이터를 가져와야 했기에 그 과정에서 삽질을,, 좀 했다. 나와 같은 사람들이 헤매지 않도록(?) 데이터 연동하는
velog.io
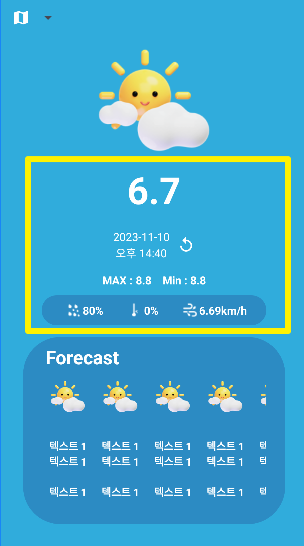
스피너 및 리사이클러뷰에 뿌려주기
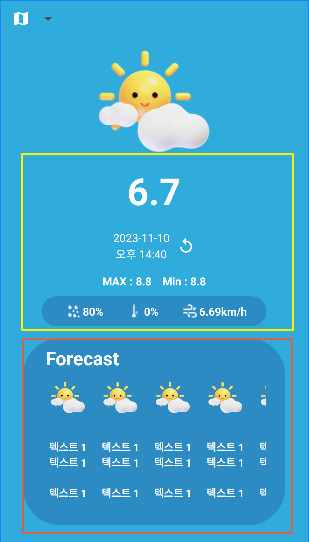
노란색 상자 : 현재 날씨 API
빨간색 상자 : 3시간씩 5일 API
5. 이제 XML을 만들어준다. 나는 스피너와 리사이클러뷰를 활용하여 만들어 주었고, xml은 본인에게 맞게 수정할 필요가 있다.
<전체 xml >
//전체 XML

<?xml version="1.0" encoding="utf-8"?>
<androidx.constraintlayout.widget.ConstraintLayout xmlns:android="http://schemas.android.com/apk/res/android"
    xmlns:app="http://schemas.android.com/apk/res-auto"
    xmlns:tools="http://schemas.android.com/tools"
    android:layout_width="match_parent"
    android:layout_height="match_parent"
    tools:context=".MainActivity">

    <LinearLayout
        android:id="@+id/spinnerRelative"
        android:layout_width="match_parent"
        android:layout_height="wrap_content"
        android:background="#30ACDC"
        app:layout_constraintEnd_toEndOf="parent"
        app:layout_constraintStart_toStartOf="parent"
        app:layout_constraintTop_toTopOf="parent">

        <ImageView
            android:id="@+id/mapIcon"
            android:layout_width="wrap_content"
            android:layout_height="wrap_content"
            android:layout_alignParentStart="true"
            android:layout_centerVertical="true"
            android:paddingStart="16dp"
            android:layout_gravity="center"
            android:src="@drawable/baseline_map_24" />

        <!-- 스피너 -->
        <com.toptoche.searchablespinnerlibrary.SearchableSpinner
            android:id="@+id/searchSpinner"
            android:layout_width="wrap_content"
            android:layout_height="50dp"
            android:layout_centerVertical="true"
            android:layout_toEndOf="@id/mapIcon"
            android:paddingStart="8dp"
            android:paddingEnd="8dp" />
    </LinearLayout>


    <androidx.constraintlayout.widget.ConstraintLayout
        android:id="@+id/morningBackground"
        android:layout_width="match_parent"
        android:layout_height="0dp"
        android:background="#30ACDC"
        app:layout_constraintBottom_toBottomOf="parent"
        app:layout_constraintEnd_toEndOf="parent"
        app:layout_constraintHorizontal_bias="1.0"
        app:layout_constraintStart_toStartOf="parent"
        app:layout_constraintTop_toBottomOf="@+id/spinnerRelative">


        <ImageView
            android:id="@+id/imageView"
            android:layout_width="150dp"
            android:layout_height="150dp"
            android:scaleType="centerCrop"
            android:src="@drawable/ic_weather"
            app:layout_constraintBottom_toTopOf="@+id/tempText"
            app:layout_constraintEnd_toEndOf="parent"
            app:layout_constraintStart_toStartOf="parent"
            app:layout_constraintTop_toTopOf="parent" />

        <TextView
            android:id="@+id/tempText"
            android:layout_width="200dp"
            android:layout_height="wrap_content"
            android:gravity="center"
            tools:text="6.7"
            android:textColor="@color/white"
            android:textSize="50sp"
            android:textStyle="bold"
            app:layout_constraintBottom_toTopOf="@+id/linearLayout"
            app:layout_constraintEnd_toEndOf="parent"
            app:layout_constraintStart_toStartOf="parent"
            app:layout_constraintTop_toBottomOf="@+id/imageView" />

        <LinearLayout
            android:id="@+id/linearLayout"
            android:layout_width="wrap_content"
            android:layout_height="wrap_content"
            android:layout_marginTop="9dp"
            android:orientation="horizontal"
            app:layout_constraintBottom_toTopOf="@+id/linearLayout2"
            app:layout_constraintEnd_toEndOf="parent"
            app:layout_constraintStart_toStartOf="parent"
            app:layout_constraintTop_toBottomOf="@+id/tempText">


            <LinearLayout
                android:layout_width="wrap_content"
                android:layout_height="wrap_content"
                android:orientation="vertical"
                app:layout_constraintEnd_toEndOf="parent"
                app:layout_constraintStart_toStartOf="parent"
                app:layout_constraintTop_toBottomOf="@+id/textView">

                <TextView
                    android:id="@+id/dayText"
                    android:layout_width="wrap_content"
                    android:layout_height="wrap_content"
                    android:layout_gravity="center"
                    tools:text="2023-11-10"
                    android:textColor="@color/white"
                    android:textSize="15sp" />

                <TextView
                    android:id="@+id/timeText"
                    android:layout_width="wrap_content"
                    android:layout_height="wrap_content"
                    android:layout_gravity="center"
                    tools:text="오후 14:40"
                    android:textColor="@color/white"
                    android:textSize="15sp" />

            </LinearLayout>

            <ImageView
                android:id="@+id/RefreshBottom"
                android:layout_width="wrap_content"
                android:layout_height="wrap_content"
                android:layout_gravity="center"
                android:layout_marginLeft="10dp"
                android:src="@drawable/replay_icon" />

        </LinearLayout>

        <LinearLayout
            android:id="@+id/linearLayout2"
            android:layout_width="wrap_content"
            android:layout_height="wrap_content"
            android:layout_marginTop="5dp"
            android:orientation="horizontal"
            app:layout_constraintBottom_toTopOf="@+id/frameLayout"
            app:layout_constraintEnd_toEndOf="parent"
            app:layout_constraintStart_toStartOf="parent"
            app:layout_constraintTop_toBottomOf="@+id/linearLayout">

            <TextView
                android:layout_width="wrap_content"
                android:layout_height="wrap_content"
                android:layout_gravity="center"
                android:text="MAX : "
                android:textColor="@color/white"
                android:textSize="15sp"
                android:textStyle="bold" />

            <TextView
                android:id="@+id/tempminText"
                android:layout_width="wrap_content"
                android:layout_height="wrap_content"
                android:layout_gravity="center"
                tools:text="8.8"
                android:textColor="@color/white"
                android:textSize="15sp"
                android:textStyle="bold" />

            <TextView
                android:layout_width="wrap_content"
                android:layout_height="wrap_content"
                android:layout_gravity="center"
                android:layout_marginLeft="15dp"
                android:text="Min : "
                android:textColor="@color/white"
                android:textSize="15sp"
                android:textStyle="bold" />

            <TextView
                android:id="@+id/tempmaxText"
                android:layout_width="wrap_content"
                android:layout_height="wrap_content"
                android:layout_gravity="center"
                tools:text="8.8"
                android:textColor="@color/white"
                android:textSize="15sp"
                android:textStyle="bold" />

        </LinearLayout>

        <LinearLayout
            android:id="@+id/frameLayout"
            android:layout_width="300dp"
            android:layout_height="40dp"
            android:orientation="horizontal"
            android:gravity="center"
            android:background="@drawable/background_radius"
            android:layout_marginBottom="5dp"
            app:layout_constraintBottom_toTopOf="@+id/frameLayout2"
            app:layout_constraintEnd_toEndOf="parent"
            app:layout_constraintStart_toStartOf="parent"
            app:layout_constraintTop_toBottomOf="@+id/linearLayout2">

                <ImageView
                    android:layout_width="wrap_content"
                    android:layout_height="wrap_content"
                    android:layout_marginLeft="5dp"
                    android:src="@drawable/ic_rain" />

                <TextView
                    android:id="@+id/rainText"
                    android:layout_width="wrap_content"
                    android:layout_height="wrap_content"
                    tools:text="80%"
                    android:textColor="@color/white"
                    android:textSize="15sp"
                    android:textStyle="bold" />

                <ImageView
                    android:layout_width="wrap_content"
                    android:layout_height="wrap_content"
                    android:layout_marginLeft="30dp"
                    android:src="@drawable/ic_humidity" />

                <TextView
                    android:id="@+id/humidityText"
                    android:layout_width="wrap_content"
                    android:layout_height="wrap_content"
                    tools:text="0%"
                    android:textColor="@color/white"
                    android:textSize="15sp"
                    android:textStyle="bold" />


                <ImageView
                    android:layout_width="wrap_content"
                    android:layout_height="wrap_content"
                    android:layout_marginLeft="30dp"
                    android:src="@drawable/ic_windspeed" />

                <TextView
                    android:id="@+id/windText"
                    android:layout_width="wrap_content"
                    android:layout_height="wrap_content"
                    tools:text="6.69km/h"
                    android:textColor="@color/white"
                    android:textSize="15sp"
                    android:textStyle="bold" />

            </LinearLayout>


        <FrameLayout
            android:id="@+id/frameLayout2"
            android:layout_width="wrap_content"
            android:layout_height="250dp"
            android:layout_marginBottom="20dp"
            android:background="@drawable/background_radius_square"
            app:layout_constraintBottom_toBottomOf="parent"
            app:layout_constraintEnd_toEndOf="parent"
            app:layout_constraintStart_toStartOf="parent"
            app:layout_constraintTop_toBottomOf="@+id/frameLayout">

            <TextView
                android:layout_width="wrap_content"
                android:layout_height="wrap_content"
                android:layout_marginLeft="30dp"
                android:layout_marginTop="10dp"
                android:text="Forecast"
                android:textColor="@color/white"
                android:textSize="25sp"
                android:textStyle="bold" />

            <androidx.recyclerview.widget.RecyclerView
                android:id="@+id/recyclerView"
                android:layout_width="300dp"
                android:layout_height="180dp"
                android:layout_gravity="center"
                android:orientation="horizontal"
                app:layoutManager="androidx.recyclerview.widget.LinearLayoutManager"
                tools:listitem="@layout/weather_item" />
        </FrameLayout>

    </androidx.constraintlayout.widget.ConstraintLayout>
</androidx.constraintlayout.widget.ConstraintLayout>
6. 검색이 가능한 스피너를 만들어보자 그레들에 아래와 같이 추가한다.
implementation 'com.toptoche.searchablespinner:searchablespinnerlibrary:1.3.1'
그리고, res - values - spinner_arrays.xml 을 만들어주고, 여기에 스피너에 들어갈 아이템을 작성한다.
<?xml version="1.0" encoding="utf-8"?>
<resources>
    <string-array name="area">
        <item>서울</item>
        <item>인천</item>
        <item>춘천</item>
        <item>강릉</item>
        <item>대전</item>
        <item>충청북도</item>
        <item>충청남도</item>
        <item>대구</item>
        <item>전주</item>
        <item>목포</item>
        <item>광주</item>
        <item>부산</item>
        <item>제주</item>
    </string-array>
</resources>
메인 엑티비티에 지역별 ID값을 arrayof로 만들어줬다.
 val spinnerItemIds = arrayOf(
            1835847, 1843561, 1845136, 1843137,
            1835224, 1845106, 1845105, 1835327,
            1845457, 1841066, 1841808, 1838519, 1846265
)package com.myungwoo.weatherapp
data class SpinnerData (val text: String,)<?xml version="1.0" encoding="utf-8"?>
<LinearLayout xmlns:android="http://schemas.android.com/apk/res/android"
xmlns:tools="http://schemas.android.com/tools"
android:layout_width="match_parent"
android:layout_height="wrap_content"
android:orientation="horizontal"
android:padding="8dp">
<!-- 텍스트를 표시할 TextView -->
<TextView
android:id="@+id/textView"
android:layout_width="match_parent"
android:layout_height="match_parent"
android:textColor="@android:color/black"
android:textSize="18sp"
tools:text="제목넣을용도" />
</LinearLayout>//스피너 만들기
var spinnerList = resources.getStringArray(R.array.area)
val spinnerItems = spinnerList.map { SpinnerData(it) }
Log.e("spinnerList", spinnerList[5].toString())
val adapter = ArrayAdapter(this, R.layout.spinner_item, R.id.textView, spinnerList)
binding.searchSpinner.adapter = adapter
binding.searchSpinner.setSelection(0) // 스피너 처음값 지정
 binding.searchSpinner.onItemSelectedListener = object : AdapterView.OnItemSelectedListener {
            override fun onItemSelected(
                parent: AdapterView<*>?,
                view: View?,
                position: Int,
                id: Long
            ) {
                val selectedItemId = ApiId[position] //선택된 API ID값

                val selectedText = spinnerItems[position].text //선택된 텍스트값
                val textView = view?.findViewById<TextView>(R.id.textView)  //스피너 텍스트 업데이트
                textView?.text = selectedText

                adapter.notifyDataSetChanged() //데이터 변경사항 알려주기

                CoroutineScope(Dispatchers.Main).launch {
                    try {
                        //선택된 selectedItemId 값으로 API 불러오기 즉, 지역별 ID값으로 불러오는것.
                        val weatherCurrentList = netWorkRepository.getCurrentList(selectedItemId)
                        val forecastWeatherData = netWorkRepository.getWeekendList(selectedItemId)

                        //스피너 클릭시 지역별로 최근날씨 변경해주기
                        updateCurrentList(weatherCurrentList)

                    } catch (e: Exception) {
                        // Handle network errors
                        Log.e("NetworkError", e.message ?: "Unknown error")
                    }
                }
            }
            override fun onNothingSelected(parent: AdapterView<*>?) {
                // Handle case where nothing is selected
                TODO("Not yet implemented")
            }
        }
    }
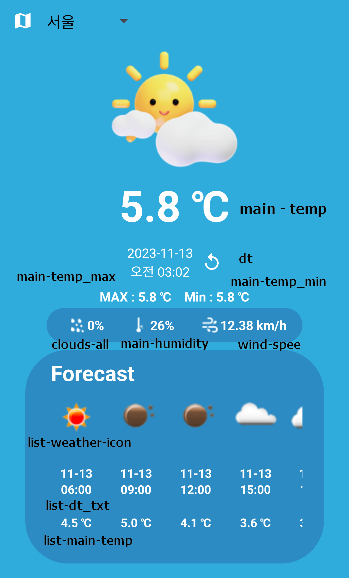
private fun updateCurrentList(weatherCurrentList: WeatherData) {
        //섭씨온도로 바꿔주기
        binding.tempText.text = convertFormatTemperature(weatherCurrentList.main.temp)
        binding.tempmaxText.text = convertFormatTemperature(weatherCurrentList.main.temp_max)
        binding.tempminText.text = convertFormatTemperature(weatherCurrentList.main.temp_min)
        //END

        //날짜와 시간 바꿔주기
        val date = Date(weatherCurrentList.dt * 1000L)
        val formattedDate = SimpleDateFormat("yyyy-MM-dd", Locale.getDefault()).format(date)
        val formattedTime = SimpleDateFormat("a hh:mm", Locale.getDefault()).format(date)
        binding.dayText.text = formattedDate
        binding.timeText.text = formattedTime
        //END

        //강수량, 습도, 풍속 바꿔주기
        binding.rainText.text = "${weatherCurrentList.clouds.all}%"
        binding.humidityText.text = "${weatherCurrentList.main.humidity}%"
        val windSpeedInKmPerH = weatherCurrentList.wind.speed * 3.6
        val formattedWindSpeed = String.format("%.2f", windSpeedInKmPerH)
        binding.windText.text = "${formattedWindSpeed} km/h"
        //END
    }

    private fun convertFormatTemperature(kelvinTemp: Double): String {
        return String.format("%.1f ℃", kelvinTemp - 273.15)
    }
여기까지가 스피너로 현재 날씨를 뿌려주는 것. 아래 노란색 박스까지만 변경되는 코드.
이제 아래 리사이클러뷰도 데이터가 변경되록 하자
스피너 참고 블로그
코틀린으로 안드로이드 스피너(Spinner) 한방에 끝내기
안녕하세요, 반갑습니다! 안드로이드에는 많은 기능 있습니다. 그 중 아래로 펼쳐지며 메뉴를 보여주는 유용한 기능이 있는데요. 가장 흔하게 보이는 앱이 있다면 사진첩 또는 브라우저가 아닐
magicalcode.tistory.com
리사이클러뷰에도 API를 받아온 것을 뿌려주자
리사이클러뷰 어댑터를 만들어준다.
package com.myungwoo.weatherapp

import android.annotation.SuppressLint
import android.content.Context
import android.util.Log
import android.view.LayoutInflater
import android.view.ViewGroup
import androidx.recyclerview.widget.RecyclerView
import com.bumptech.glide.Glide
import com.myungwoo.weatherapp.databinding.WeatherItemBinding
import com.myungwoo.weatherapp.network.data.WeekendWeatherData
import java.text.SimpleDateFormat
import java.util.Locale

class WeatherAdapter(val context: Context,  var data: MutableList<WeekendWeatherData>) :
    RecyclerView.Adapter<WeatherAdapter.CustomViewHolder>() {

    override fun onCreateViewHolder(parent: ViewGroup, viewType: Int): CustomViewHolder {
        val binding = WeatherItemBinding.inflate(LayoutInflater.from(parent.context), parent, false)
        return CustomViewHolder(binding)
    }

    override fun getItemCount() = data.size

    override fun onBindViewHolder(holder: CustomViewHolder, position: Int) {
        val binding = holder.binding
        val weatherItem = data[position]

        Log.e("weatherItem", weatherItem.dt_txt.toString())

        //날짜와 시간 불러오기
        val inputFormat = SimpleDateFormat("yyyy-MM-dd HH:mm:ss", Locale.getDefault())
        val outputDateFormat = SimpleDateFormat("MM-dd", Locale.getDefault())
        val outputTimeFormat = SimpleDateFormat("HH:mm", Locale.getDefault())
        val date = inputFormat.parse(weatherItem.dt_txt)
        binding.dayText.text = outputDateFormat.format(date)
        binding.timeText.text = outputTimeFormat.format(date)
        //END

        //섭씨온도로 바꿔주기
        val formattedTemp = convertAndFormatTemperature(weatherItem.main.temp)
        binding.tempText.text = "${formattedTemp} ℃"
        //END

        //아이콘 불러오기
        val icon = weatherItem.weather[0].icon
        val iconUrl = "https://openweathermap.org/img/w/$icon.png"
        Glide.with(context)
            .load(iconUrl)
            .error(R.drawable.ic_weather)
            .into(binding.weatherIcon)

    }
    fun updateData(newData: List<WeekendWeatherData>) {
        data.clear()
        data.addAll(newData)
        notifyDataSetChanged()
    }

    inner class CustomViewHolder(val binding: WeatherItemBinding) :
        RecyclerView.ViewHolder(binding.root)
}

private fun convertAndFormatTemperature(kelvinTemp: Double): String {
    val celsiusTemp = kelvinTemp - 273.15
    return String.format("%.1f", celsiusTemp)
}
메인 엑티비티에 불러올 APi를 받을거 추가
private var weatherData = mutableListOf<WeekendWeatherData>()
리사이클러뷰 이어주기
//리사이클러뷰 만들기
val recyclerViewAadapter = WeatherAdapter(this, weatherData)
binding.recyclerView.adapter = recyclerViewAadapter
스피너를 클릭했을때 데이터가 변동되도록 추가해주기
위에 스피너 할때 binding.searchSpinner.onItemSelectedListener 여기에
val forecastWeatherData = netWorkRepository.getWeekendList(selectedItemId)
이 부분밑에 아래 코드만 추가해주면 된다.
//리사이클러뷰에 뿌려줄 Data를 weekendData 넣어주기
val weekendData = forecastWeatherData.list
recyclerViewAadapter.updateData(weekendData)
이것만 추가해주면 된다. 그럼 잘 돌아간다앙!!
GitHub - AnMyungwoo94/WeatherApp
Contribute to AnMyungwoo94/WeatherApp development by creating an account on GitHub.
github.com
'안드로이드앱' 카테고리의 다른 글
| 안드로이드 지라프(GIRAFFE) , 고슴도치(hedgehog) 버전 API키 숨기기 (0) | 2023.12.13 |
|---|---|
| 안드로이드 날씨앱 위젯만들기 도전 1! (0) | 2023.11.16 |
| 안드로이드 코틀린 결제창 연동! Bootpay 이니시스 테스트 모드 (1) | 2023.10.31 |
| 빗썸 코인 API Room DB사용하여 저장하기 (0) | 2023.10.23 |
| 빗썸 코인 리스트 가져오기 API 불러오기 통신하기 (1) | 2023.10.18 |