
저번에 날씨앱을 만들어봤는데 조금 더 완성도를 높이고 싶은 마음에 위젯을 추가해 보기로 한다.
오늘은 위젯만들기 도전 1편은 위젯만 띄우는 거에 중점을 둔다.
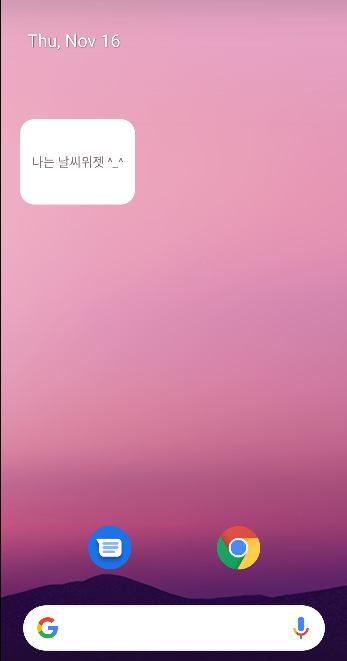
그래서 실행 결과물이 이렇다. 2편에서는 날씨 데이터와 아이콘 등등을 직접 다 불러올 것이다.
< 날씨앱 만들기 링크>
안드로이드 코틀린 프로젝트 날씨앱 만들기!
1. 오픈웨더에 가입 후 API키를 얻는다. 2. 내가 사용할 API를 고른다. 유로가 많아서 무료로 사용이 가능한 실시간현재날씨와 3시간, 5일의 날씨 API를 얻는다. 이또한 무료버전은 불러올 수 있는 횟
jejublog94.tistory.com
1. widget 이름의 폴더를 따로 만들고 그 안에 WeatherAppWidgetProvider이라는 클래스를 만들어준다,
AppWidgetProvider()을 상속시켜 준다. 그리고 위젯 만들기에 가장 중요한 onUpdate를 공식문서에서 제공하는 코드를 붙여준다. 공식문서에서 기본 코드는 제공해 주니 내게 맞게 바꿔주기만 하면 된다.
앱 위젯 빌드 | Android 개발자 | Android Developers
앱 위젯은 다른 애플리케이션(예: 홈 화면)에 삽입되어 주기적인 업데이트를 받을 수 있는 소형 애플리케이션 뷰입니다. 이러한 뷰는 사용자 인터페이스에서 위젯이라고 하며 앱 위젯 공급자를
developer.android.com
//공식문서 Provider

class WeatherAppWidgetProvider : AppWidgetProvider() {

    override fun onUpdate(
                context: Context,
                appWidgetManager: AppWidgetManager,
                appWidgetIds: IntArray
        ) {
            // Perform this loop procedure for each App Widget that belongs to this provider
            appWidgetIds.forEach { appWidgetId ->
                // Create an Intent to launch ExampleActivity
                val pendingIntent: PendingIntent = Intent(context, ExampleActivity::class.java)
                        .let { intent ->
                            PendingIntent.getActivity(context, 0, intent, 0)
                        }

                // Get the layout for the App Widget and attach an on-click listener
                // to the button
                val views: RemoteViews = RemoteViews(
                        context.packageName,
                        R.layout.appwidget_provider_layout
                ).apply {
                    setOnClickPendingIntent(R.id.button, pendingIntent)
                }

                // Tell the AppWidgetManager to perform an update on the current app widget
                appWidgetManager.updateAppWidget(appWidgetId, views)
            }
        }
}
일단 넣으면 빨간 줄이 나오긴 하는데 import 할 수 있는 것들은 다 해주고 나머지는 우선 놔둔다. 뒤이에 만들 파일들이 필요하기 때문에 오류가 나는 것이다.
2. xml 만들기! 아래와 같이 새로운 리소스 파일을 만들어주고, Root element에 appwidget-provider로 설정한다.
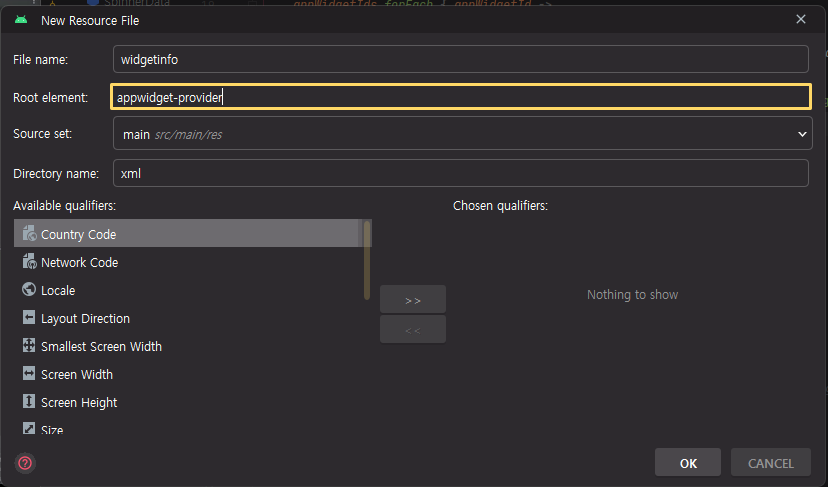
그리고 앱 공식 문서에 나오는 xml코드를 붙여 넣어준다.
//공식문서 코드
<appwidget-provider xmlns:android="http://schemas.android.com/apk/res/android"
        android:minWidth="40dp"
        android:minHeight="40dp"
        android:updatePeriodMillis="86400000"
        android:previewImage="@drawable/preview"
        android:initialLayout="@layout/example_appwidget"
        android:configure="com.example.android.ExampleAppWidgetConfigure"
        android:resizeMode="horizontal|vertical"
        android:widgetCategory="home_screen">
</appwidget-provider>//내가 바꿔 만들어본 코드
<?xml version="1.0" encoding="utf-8"?>
<appwidget-provider xmlns:android="http://schemas.android.com/apk/res/android"
android:minWidth="11dp"
android:minHeight="40dp"
android:updatePeriodMillis="14400000" //네시간에 한번씩 업데이트
android:initialLayout="@layout/widget_weather"
android:resizeMode="none"
android:widgetCategory="home_screen">
</appwidget-provider>
layout 파일에 android:initialLayout="@layout/widget_weather" 안에 넣을 xml파일을 또 만들어준다.
//widget_weather.xml파일

<?xml version="1.0" encoding="utf-8"?>
<LinearLayout xmlns:android="http://schemas.android.com/apk/res/android"
    xmlns:tools="http://schemas.android.com/tools"
    android:layout_width="match_parent"
    android:layout_height="match_parent"
    android:gravity="center"
    android:background="@color/white"
    android:orientation="vertical"
    tools:layout_height="40dp"
    tools:layout_width="110dp">

    <TextView
        android:id="@+id/testTextView"
        android:layout_width="wrap_content"
        android:layout_height="wrap_content"
        android:text="나는야 날씨위젯 ^_^" />

</LinearLayout>
그다음에 매니페스트에 아래와 같이 등록해 준다.
<receiver android:name=".widget.WeatherAppWidgetProvider"
    android:exported="true">
    <intent-filter>
        <action android:name="android.appwidget.action.APPWIDGET_UPDATE" />
    </intent-filter>
    <meta-data android:name="android.appwidget.provider"
        android:resource="@xml/widget_info" />
</receiver>
이것을 토대로 1번에서 진행했던 WeatherAppWidgetProvider 클래스의 최종코드는 아래와 같다.
이러면 오류가 다 사라질 것이다.
package com.myungwoo.weatherapp.widget

import android.app.PendingIntent
import android.appwidget.AppWidgetManager
import android.appwidget.AppWidgetProvider
import android.content.Context
import android.content.Intent
import android.widget.RemoteViews
import com.myungwoo.weatherapp.MainActivity
import com.myungwoo.weatherapp.R

class WeatherAppWidgetProvider : AppWidgetProvider() {

    override fun onUpdate(
        context: Context,
        appWidgetManager: AppWidgetManager,
        appWidgetIds: IntArray
    ) {
        // Perform this loop procedure for each App Widget that belongs to this provider
        appWidgetIds.forEach { appWidgetId ->
            // Create an Intent to launch ExampleActivity
            val pendingIntent: PendingIntent = Intent(context, MainActivity::class.java)
                .let { intent -> //FLAG_IMMUTABLE 안드로이드 12부터는 선언을 해줘야해
                    PendingIntent.getActivity(context, 1, intent, PendingIntent.FLAG_IMMUTABLE)
                }

            // Get the layout for the App Widget and attach an on-click listener
            // to the button
            val views: RemoteViews = RemoteViews(
                context.packageName,
                R.layout.widget_weather
            ).apply {
                setOnClickPendingIntent(R.id.testTextView, pendingIntent)
            }

            // Tell the AppWidgetManager to perform an update on the current app widget
            appWidgetManager.updateAppWidget(appWidgetId, views)
        }
    }

}
그리고 실행시키면 끝!! 그럼 기본적으로 위젯이 생성된다.
위젯 생성은 기기별로 다르긴 하지만 휴대폰 화면을 꾹 누르면 widget이 생성된다. 거기서 내 어플을 클릭하고 나타난 위젯을 드래그해서 바탕화면으로 옮겨주면 끝!! 영상 첨부하고 마무리하겠다. 그럼 다음 2편에서는 내가 가져온 날씨 데이터와 아이콘을 위젯에 뿌려주도록 해보겠다.

많이 참고한 블로그
[Android] 위젯 만들기 #1
안드로이드에서 위젯 만들기
velog.io
'안드로이드앱' 카테고리의 다른 글
| API 불러오기 HttpURLConnection, Gson, Rtrofit2 까지 모두 (0) | 2023.12.13 |
|---|---|
| 안드로이드 지라프(GIRAFFE) , 고슴도치(hedgehog) 버전 API키 숨기기 (0) | 2023.12.13 |
| 안드로이드 코틀린 프로젝트 날씨앱 만들기! (2) | 2023.11.13 |
| 안드로이드 코틀린 결제창 연동! Bootpay 이니시스 테스트 모드 (1) | 2023.10.31 |
| 빗썸 코인 API Room DB사용하여 저장하기 (0) | 2023.10.23 |